Improving mobility isn’t just about stretching - it’s about how well your joints and muscles work together. Yoga is a simple, effective way to boost your range of motion, balance, and strength. Here are 10 poses that target both flexibility and mobility, with tips to keep it safe and beginner-friendly:
The 10 Poses:
- Cat-Cow Pose: Loosens up the spine and neck.
- Low Lunge: Opens tight hips and stretches quads.
- Deep Squat: Builds hip and ankle mobility.
- Bridge Pose: Strengthens your back and improves hip flexibility.
- Warrior II: Enhances hip strength and balance.
- Downward Dog: Stretches shoulders, hamstrings, and calves.
- Child’s Pose: Relieves tension in the spine and hips.
- Thread the Needle: Boosts shoulder and upper back mobility.
- Half Lord of the Fishes: Increases spinal rotation and hip flexibility.
- Forward Fold: Stretches hamstrings and eases lower back tension.
Quick Safety Tips:
- Warm up for 10–15 minutes with dynamic movements.
- Use props like yoga blocks or blankets for better alignment.
- Avoid sharp or radiating pain - listen to your body.
- Hold each pose for 30–60 seconds, adjusting based on your level.
Why It Matters:
These poses improve how your body moves, making daily activities easier and reducing injury risks. Plus, yoga helps lower stress and enhances overall well-being. Whether you’re a beginner or advanced, these poses can fit into your routine.
Table: Quick Comparison of Poses
| Pose Name | Target Areas | Difficulty | Key Benefits | Hold Time |
|---|---|---|---|---|
| Cat-Cow | Spine, Core, Neck | Beginner | Improves spinal flexibility | 5–10 breaths |
| Low Lunge | Hips, Quads, Groin | Beginner-Intermediate | Opens hips, improves balance | 30–60 seconds |
| Deep Squat | Hips, Ankles, Back | Intermediate | Boosts hip and ankle mobility | 1–3 minutes |
| Bridge Pose | Spine, Hips, Chest | Beginner | Strengthens back and hips | 30–45 seconds |
| Warrior II | Hips, Legs, Shoulders | Beginner-Intermediate | Builds strength and balance | 45–60 seconds |
| Downward Dog | Shoulders, Hamstrings | Intermediate | Full-body stretch | 30–60 seconds |
| Child’s Pose | Lower Back, Hips | Beginner | Relieves tension, reduces stress | 1–5 minutes |
| Thread the Needle | Upper Back, Shoulders | Beginner | Improves rotation, releases tension | 30–45 seconds |
| Half Lord of the Fishes | Spine, Hips, Neck | Intermediate | Enhances rotation and flexibility | 30–60 seconds |
| Forward Fold | Hamstrings, Back | Beginner | Stretches and decompresses spine | 1–2 minutes |
Start small, stay consistent, and watch your mobility improve over time!
Yoga for Beginners | 20 min FLEXIBILITY & MOBILITY Yoga
Understanding Mobility vs. Flexibility
Mobility is about how freely a joint can move through its full range of motion, while flexibility refers to how far muscles can stretch. When combined with strength and control, these two elements create the foundation for functional movement - critical in yoga practice. For example, in poses like Downward Dog, controlled joint motion (mobility) and muscle stretch (flexibility) work together seamlessly.
Mobility involves the ability of your joints to move freely and efficiently, requiring both flexibility and strength. For instance, you might have the flexibility to touch your toes, but without mobility, you might struggle to maintain control or proper form during dynamic movements.
Here’s a quick breakdown of how mobility and flexibility complement each other:
| Aspect | Mobility | Flexibility |
|---|---|---|
| Focus | Joint movement and control | Muscle lengthening |
| Primary Benefit | Improves movement quality | Expands range of motion |
| Role in Injury Prevention | Stabilizes joint function | Reduces muscle tightness |
| Impact on Daily Life | Enhances functional movement | Increases stretch capacity |
In yoga, this relationship is key. Take Downward Dog as an example: while you’re stretching your hamstrings (flexibility), you’re also working on shoulder mobility and core stability. This balance not only lowers injury risk but also improves posture, builds strength, and enhances daily movement.
This distinction also explains why someone may be highly flexible but struggle with controlled movements or why a strong person might have limited range of motion. Yoga addresses both areas, making it a powerful way to develop a well-rounded physical practice.
By practicing yoga with intention, you can build strength and stretch capacity, allowing safe and effective movement through your full range of motion. Next, we’ll dive into specific yoga poses designed to target both mobility and flexibility for a balanced approach to physical health.
This article is for informational purposes only and is not intended as medical advice. Please consult a healthcare professional before starting any new fitness or wellness routine.
Safety Tips for Mobility-Focused Yoga
Taking the right precautions can help you avoid injuries and make the most of your yoga practice. In 2019 alone, 34,000 yoga-related injuries were treated in U.S. emergency rooms. A mindful approach can keep you safe while improving your mobility.
Warm-Up Tips
Dedicate 10–15 minutes to warming up with dynamic movements. This not only prepares your body but also supports joint health and can improve Functional Movement Screen scores by nearly 30%.
Practice Guidelines
Follow these recommendations to reduce injury risk while tailoring your yoga sessions to your experience level:
| Experience Level | Session Duration | Weekly Frequency | Rest Between Sessions |
|---|---|---|---|
| Beginner | 20 minutes | 3 times | 48 hours |
| Intermediate | 30 minutes | 3–4 times | 24–48 hours |
| Advanced | 60 minutes | 4–5 times | 24 hours |
Breathing and Movement
Incorporate Ujjayi breathing into your routine. This technique can help you stay stable, avoid dizziness, and engage your core effectively.
Key Safety Tips
- Keep your knees aligned over your ankles during standing poses.
- Maintain a neutral spine in forward folds to avoid strain.
- Slightly bend your elbows and knees to prevent hyperextension.
- Drink 8–16 oz of water about 30 minutes before your session to stay hydrated.
Props for Better Alignment
Using props like a non-slip mat, foam blocks, or a folded blanket can help with proper alignment. Non-slip mats, for example, reduce slip-related injuries by 62%.
Recognizing Warning Signs
If you feel sharp or radiating pain, numbness, dizziness, or tremors lasting more than 10 seconds, stop immediately and assess the situation.
Recovery After Practice
Spend 5–7 minutes cooling down with gentle stretches and diaphragmatic breathing. This can cut muscle soreness by 41%. In fact, an 8-week alignment-focused yoga program was shown to reduce hamstring injuries by 37% in a 2023 study.
Special Notes for Older Adults
Adults over 55 are three times more likely to experience yoga-related injuries. If you’re in this age group, starting with guidance from a certified instructor is a smart choice.
By keeping these safety tips in mind, you can approach your yoga practice with confidence and reduce the risk of injury.
This article is for informational purposes only and is not intended as medical advice. Please consult a healthcare professional before starting any new fitness or wellness routine.
1. Cat-Cow Pose (Bitilasana/Marjaryasana)
The Cat-Cow Pose combines two movements - Cow Pose, which stretches your spine upward, and Cat Pose, which rounds it downward. Here's how to do it step by step:
Step-by-Step Instructions
- Begin in a tabletop position, with your hands and knees on the floor.
- Align your wrists under your shoulders and your knees under your hips.
- Cow Pose (Inhale):
- Let your belly sink toward the ground.
- Lift your chest and gaze slightly upward, creating a gentle arch in your back.
- Cat Pose (Exhale):
- Round your spine upward toward the ceiling.
- Tuck your chin to your chest, creating a soft curve along your back.
Move smoothly between these two positions, coordinating your breath with each motion.
2. Low Lunge (Anjaneyasana)
The Low Lunge, or Anjaneyasana, is a go-to pose for improving hip flexibility and mobility. It's especially helpful for easing tight hips caused by too much sitting. Building on the spine movements from Cat-Cow, this pose focuses on opening the hips, which are key for smooth, functional movement.
Step-by-Step Instructions
- Begin in a tabletop position.
- Step your right foot forward between your hands.
- Lower your left knee to the mat, with the top of your back foot flat.
- Lift your torso upright.
Form and Alignment Tips
Proper alignment is essential to avoid injuries and get the most out of this pose:
- Keep your front knee aligned with your second toe, ensuring it doesn’t go past your toes.
- Level and square your hips.
- Relax your shoulders down and away from your ears.
- Engage your core lightly for stability.
- Keep your torso upright - don’t lean forward.
- Balance your weight evenly between both legs.
Breathing Guidance
Hold the pose for 5–8 deep breaths on each side. Inhale to lengthen your spine, and exhale to sink deeper into the stretch.
Adjustments for Beginners
If you’re just starting or have limited flexibility, try these adjustments:
- Place a folded blanket under your back knee for cushioning.
- Use yoga blocks under your hands for extra support.
- Hold the pose for 30 seconds on each side to ease into it.
This article is for informational purposes only and not a substitute for medical advice. Always consult a healthcare professional before starting a new fitness or wellness routine.
3. Deep Squat (Malasana)
Malasana, often referred to as the deep squat, builds on the hip-opening benefits of the Low Lunge by engaging multiple joints. This yoga pose mimics a natural squatting position, making it an excellent way to counteract the effects of prolonged sitting. Follow these steps to practice Malasana safely and effectively.
Step-by-Step Instructions
- Stand with your feet about hip-width apart, toes angled out slightly (around 15°).
- Lower your body into a deep squat position.
- Press your elbows against the insides of your knees, bringing your palms together in front of your chest.
- Engage your core and lengthen your spine.
- Hold this position for 30–60 seconds, maintaining steady, even breathing.
Form and Alignment Tips
To get the most out of Malasana and avoid strain, focus on proper alignment:
- Ensure your knees stay aligned over your toes.
- Distribute your weight evenly across all four corners of your feet.
- Keep your spine neutral - avoid rounding your lower back.
- Relax your shoulders, drawing them away from your ears.
- Lift and open your chest.
"Malasana restores natural squat mechanics lost in desk-bound populations", says Dr. Ray Long, orthopedic surgeon and yoga anatomy expert.
Key Benefits
Research highlights several mobility benefits of Malasana:
| Joint/Area | Benefit | Research Insight |
|---|---|---|
| Ankles | Improved dorsiflexion | Requires a 38.5° ±5.9° range |
| Hips | Enhanced external rotation | 15–20% improvement in sedentary adults |
| Spine | Increased thoracic mobility | Helps reduce lower back tension |
Modifications for Beginners
If you're just starting or have limited flexibility, try these adjustments:
- Sit on a folded yoga block for added support.
- Use a wall for balance by standing 12–18 inches away and leaning back slightly.
- Widen your stance to ease tension on your knees.
- Place a rolled towel under your heels if they don't reach the ground.
Breathing Technique
Use your breath to enhance stability and alignment. Inhale deeply for a count of three to lengthen your spine, then exhale slowly using diaphragmatic breathing to maintain your posture.
Common Mistakes to Avoid
Watch out for these common errors:
- Knees collapsing inward.
- Heels lifting off the ground.
- Rounding your upper back.
- Overarching your lower back.
Dr. Lauren Ohayon advises, "Overarching the lower back is equally risky - aim for a neutral pelvis."
Safety Considerations
Be cautious if you have:
- Recent injuries to the knees or ankles.
- Lower back problems.
- A history of abdominal surgery.
- SI joint dysfunction.
This guide is for informational purposes only and should not replace medical advice. Always consult a healthcare professional before starting a new fitness or wellness routine.
4. Bridge Pose (Setu Bandhasana)
Bridge Pose builds on earlier poses by focusing on spinal extension, hip flexibility, and strengthening the muscles along the back of your body.
Step-by-Step Instructions
- Lie on your back with your knees bent and feet hip-width apart.
- Position your feet about 10–12 inches from your hips, ensuring your heels are under your knees.
- Press your feet into the mat and tighten your glutes.
- Gradually lift your hips toward the ceiling.
- Interlace your fingers underneath your pelvis to broaden your chest.
- Hold the pose for 5–8 breaths, then lower your spine slowly, one vertebra at a time.
Form and Alignment Tips
- Distribute your weight evenly across both feet.
- Keep your pelvis neutral throughout the pose.
- Squeeze your shoulder blades together.
- Align your neck with your spine.
"Imagine squeezing a block between your knees to maintain proper alignment", advises yoga instructor Anna York (Fitup, 2024).
Benefits of Regular Practice
Bridge Pose offers targeted improvements in mobility and strength:
| Joint Area | Mobility Gain | Research Insight |
|---|---|---|
| Spine | Better thoracic extension | 15–20° increase after 8 weeks |
| Hips | Greater hip extension range | 19% improvement |
| Lumbar | Reduced stiffness | 34% improvement in flexibility |
| Glutes | Enhanced activation | 40% more activation compared to squats |
Modifications
For Beginners:
- Use a yoga block under your sacrum for extra support.
- Keep your arms relaxed alongside your body.
- Shorten the hold to 3–5 breaths.
Advanced Options:
- Try lifting one leg while holding the pose.
- Extend the hold to 30 seconds or longer.
- Add a resistance band above your knees for extra challenge.
Breathing Technique
Focus on deep, diaphragmatic breathing. Inhale to expand your ribcage while maintaining your lift; exhale to engage your core and deepen the posture.
Common Mistakes to Avoid
- Overarching the lower back, especially for beginners.
- Letting your feet roll outward.
- Rushing through the transitions.
- Forgetting to breathe steadily.
Dr. Sarah Lin, DPT, recommends: "Pulse your hips upward 1–2 inches for 10 reps to activate the glute medius. This improves stability and boosts mobility benefits."
Safety Tips
Take extra care if you have:
- Recent neck or shoulder injuries
- Pregnancy (consider reducing the elevation)
- High blood pressure
- Lower back pain or sensitivity
Building Your Practice
For the best results:
- Beginners: Hold for 3–5 breaths, repeating 3 times.
- Intermediate: Aim for 30-second holds across 3 sets.
- Advanced: Work toward holding for up to 2 minutes.
A 2024 study found that daily 90-second holds for six weeks improved hip extension mobility by 28%.
Up next, we’ll dive into poses that further enhance your mobility journey.
This article is for informational purposes only and is not a substitute for professional medical advice. Always consult a healthcare provider before starting a new fitness routine.
5. Warrior II (Virabhadrasana II)
Warrior II is a powerful pose for improving hip flexibility and building lower body strength, making everyday movements easier and more efficient.
Step-by-Step Instructions
- Start in Mountain Pose (Tadasana) and step your feet about 3.5–4 feet apart.
- Turn your right foot out 90° and your left foot in about 45°. Align your right heel with the arch of your left foot.
- Bend your right knee to form a 90° angle, ensuring it stays directly above your ankle.
- Stretch your arms out to the sides, parallel to the floor, with palms facing down.
- Gaze over your right fingertips.
- Hold this position for 5–8 breaths, then switch sides.
Form and Alignment Tips
| Body Part | Proper Alignment | Common Mistakes |
|---|---|---|
| Front Knee | Directly over the ankle | Allowing the knee to collapse inward |
| Hips | Level and squared | Tilting forward |
| Back Leg | Straight and firmly grounded | Lifting or over-rotating |
| Torso | Upright and centered | Leaning forward |
Mobility Benefits
Research highlights the impact of Warrior II on movement and strength:
- 15–20% improvement in lateral hip flexibility over 8 weeks.
- 34% boost in postural stability.
- 22% increase in walking speed for older adults.
- 40% more gluteus medius activation compared to lunges.
"Press the floor apart with your feet to engage the inner thighs. This technique enhances hip flexibility while protecting your knees", suggests yoga therapist Dr. Sarah Collins.
Modifications
For Beginners:
- Place a chair under your front thigh for extra support.
- Keep your hands on your hips to focus on alignment.
- Shorten your stance to 2.5–3 feet and practice near a wall for added balance.
For Advanced Practitioners:
- Gradually increase your hold time to 45–60 seconds as your stability and strength improve.
Breathing Technique
- Inhale deeply to lengthen your spine.
- Exhale as you deepen the bend in your front knee.
- Maintain slow, steady breaths throughout the pose.
Integration Tips
- Warm up with poses like Cat-Cow and Low Lunge.
- Follow Warrior II with Triangle Pose for a seamless flow.
- Use Child's Pose afterward to release tension.
- Add Warrior II to your morning routine to enhance daily mobility.
Continue exploring poses that challenge your balance and flexibility as you progress in your practice.
This article is for informational purposes only and is not a substitute for medical advice. Always consult a healthcare professional before starting a new fitness program.
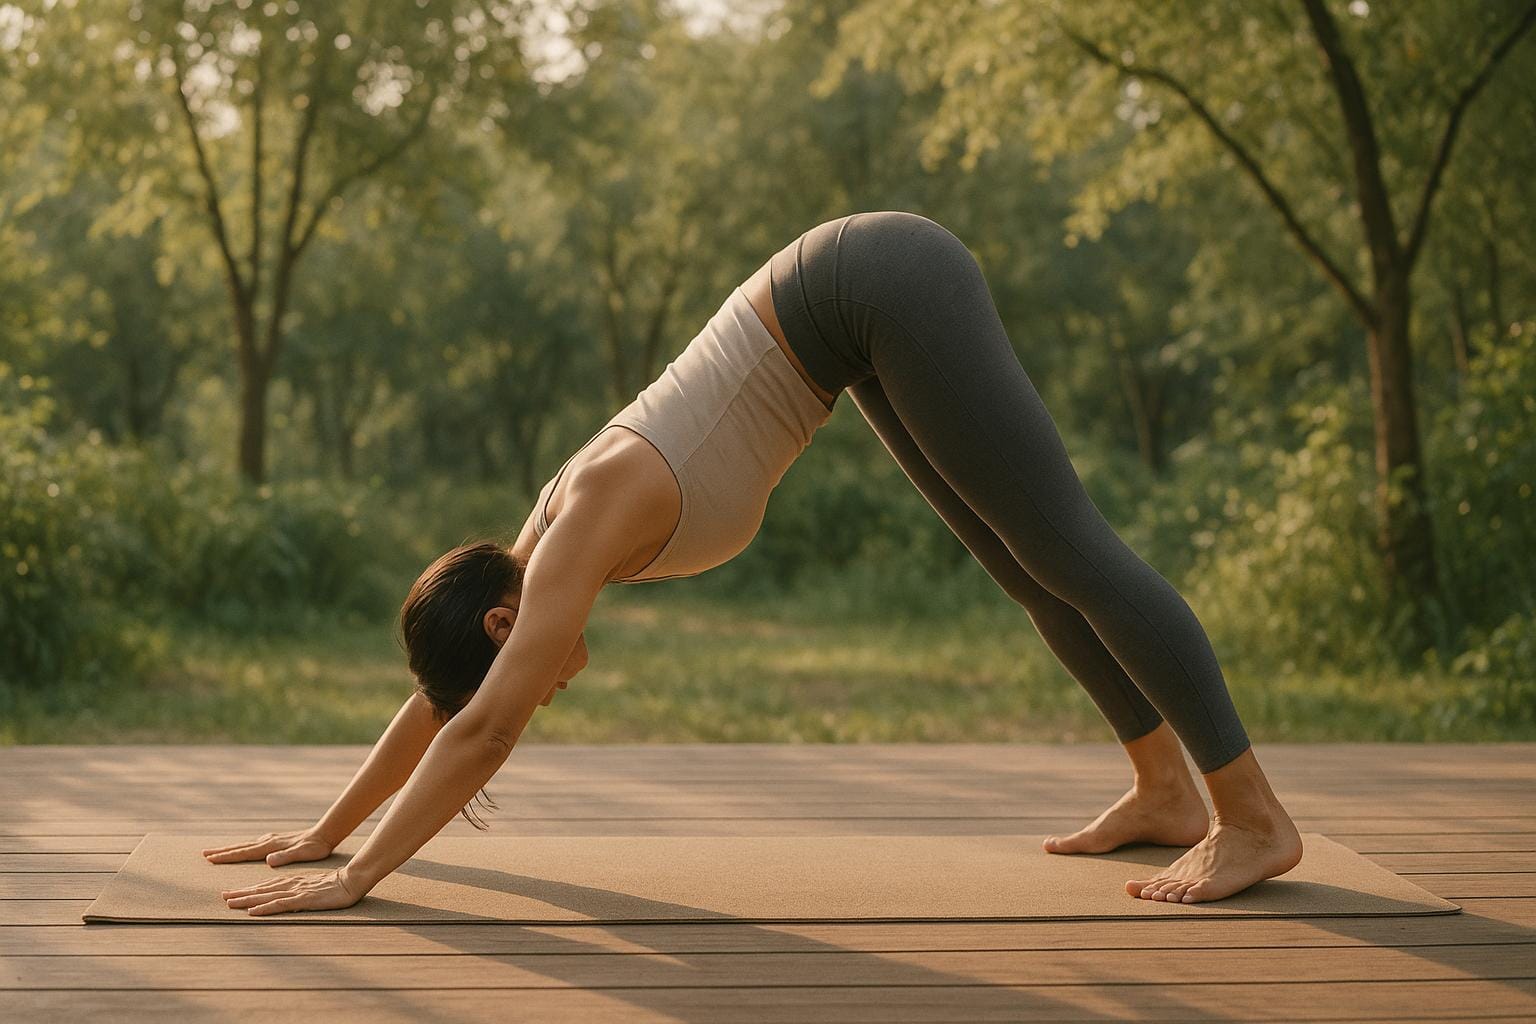
6. Downward Dog (Adho Mukha Svanasana)
Downward Dog is a core yoga pose that promotes full-body flexibility and strengthens key muscles. It focuses on improving shoulder mobility and hamstring flexibility, which are essential for healthy movement. Here’s how to perform it effectively.
Step-by-Step Instructions
- Begin in a tabletop position on your hands and knees.
- Spread your fingers wide and press firmly into your palms.
- Tuck your toes under and lift your hips toward the ceiling.
- Straighten your arms and legs, creating an inverted V-shape with your body. Press your chest gently toward your thighs to elongate your spine.
- Hold the position for 5-8 breaths, deepening the stretch with each exhale.
Form and Alignment Tips
To get the most out of this pose and avoid injuries, pay attention to these alignment cues:
| Body Part | Proper Alignment | Common Mistakes |
|---|---|---|
| Spine | Long and neutral | Rounding or over-arching |
| Shoulders | Rotated outward, away from the ears | Letting the shoulders collapse |
| Hands | Fingers spread, weight evenly distributed | Uneven pressure or lifted fingers |
| Feet | Hip-width apart, heels reaching downward | Feet placed too wide or too narrow |
Benefits
When done with proper alignment, Downward Dog can improve shoulder and hamstring flexibility, support spinal extension, and enhance core stability. It's a versatile pose that fits into many yoga routines, whether you're just starting out or refining your practice.
Modifications for Beginners
- Keep a slight bend in your knees to maintain a long spine and reduce tension if your hamstrings feel tight.
Breathing Tips
- Inhale to lengthen your spine.
- Exhale as you press your heels closer to the floor.
This guide is for informational purposes only. Always consult a healthcare professional before starting any new fitness or wellness routine.
7. Child's Pose (Balasana)
Child's Pose is a gentle stretch that helps release tension in the spine while improving flexibility in the hips and ankles. A 2023 study published in the Journal of Yoga Therapy revealed that holding this pose for just 2 minutes increased lumbar spine mobility by 15% in sedentary adults.
Step-by-Step Instructions
- Begin on all fours with your knees aligned under your hips.
- Bring your big toes together and gently lower your hips back toward your heels.
- Stretch your arms forward, pressing your palms into the mat.
- Rest your forehead on the floor.
- Take slow, deep breaths, focusing on expanding your back with each inhale.
Benefits
Child's Pose provides several physical benefits:
- Spinal relief: Gently stretches and decompresses the spine.
- Hip flexibility: Loosens tight hip flexors and supports joint mobility.
- Ankle range of motion: Helps improve ankle flexibility.
- Shoulder relaxation: Eases tension through extended arms.
Modifications for Comfort
If you find the pose challenging, try these adjustments:
- Use a folded blanket under your knees for extra padding.
- Place a yoga block under your forehead to ease neck strain.
- Widen your knees for added comfort, especially during pregnancy or postpartum.
- Add a bolster under your chest if your hips feel tight.
Breathing Technique
To deepen the stretch and release tension, try this breathing method:
- Inhale deeply through your nose, focusing on expanding your ribs outward.
- Exhale slowly through your mouth, gently pulling your navel toward your spine.
- Direct your breath to areas where you feel tightness.
Integration Tips
Incorporating Child's Pose into your routine can yield noticeable results. Research from YogaSix studios found that using props in this pose during beginner mobility classes sped up hip flexibility improvements by 42%. Aim to hold the pose for 2–3 minutes daily or for 5 minutes three times a week.
Special Considerations
- For office workers: Practicing this pose for 5 minutes a day can reduce neck and upper spine stiffness by 28%.
- For athletes: Use it between strength exercises to maintain hip mobility.
- For recovery: This pose is ideal for decompressing the spine after high-impact activities.
Child's Pose is a calming stretch that prepares your body for more active movements while promoting relaxation.
This article is for informational purposes only and is not intended as medical advice. Always consult a healthcare professional before starting any new fitness or wellness routine.
8. Thread the Needle
Thread the Needle is a gentle twist designed to improve mobility in the spine, shoulders, and neck. It’s a calming pose that follows movements aimed at increasing shoulder and spine flexibility.
Step-by-Step Instructions
- Begin in a tabletop position with your wrists aligned under your shoulders and your knees under your hips.
- Take a deep breath in.
- As you exhale, slide your right arm underneath your left arm, with your palm facing upward.
- Rest your right shoulder and the side of your head (temple) on the mat.
- Stretch your left arm forward overhead, or wrap it around your waist if that feels more comfortable.
- Hold the position for 30–60 seconds, breathing steadily.
- Push into your left hand to return to the tabletop position.
- Repeat the movement on the other side.
Benefits
- Spinal rotation: Supports better movement in your thoracic spine.
- Shoulder flexibility: Loosens up tightness in the shoulders.
- Neck relief: Provides a gentle stretch for the neck muscles.
- Upper back release: Helps ease tension in the area between the shoulder blades.
Modifications for Comfort
- Place a folded blanket under your supporting shoulder for extra cushioning.
- Use a yoga block under your head to reduce neck strain.
- Keep your top arm extended if wrapping it around your waist feels uncomfortable.
- Add a bolster under your torso for more support if needed.
Breathing Technique
Breathe deeply to lengthen your spine as you prepare to twist. Exhale slowly as you slide your arm through, letting your breath guide you deeper into the stretch.
Special Considerations
- Hold Time: Aim to stay in the pose for 30–60 seconds on each side.
- Injuries: Avoid this pose if you have acute shoulder or knee issues.
- Core Activation: Lightly engage your core to protect your lower back during the movement.
This content is for informational purposes only and does not replace professional medical advice. Consult with a healthcare provider before starting any new exercise or wellness routine.
9. Half Lord of the Fishes (Ardha Matsyendrasana)
This pose helps improve mobility by enhancing thoracic rotation and hip external rotation, building on the spinal movements practiced in earlier poses.
Step-by-Step Instructions
- Sit on your mat with your legs extended in front of you.
- Bend your right knee and position your foot outside your left thigh.
- Inhale to lengthen your spine, then exhale as you twist your torso to the right.
- Hook your left elbow outside your right knee for leverage.
- Place your right hand on the floor behind you for support.
- Turn your head to look over your right shoulder.
- Hold the pose for 30–60 seconds, then switch sides.
Focusing on alignment during this pose helps deepen the twist and enhances mobility.
Benefits
- Spinal Mobility: Improves thoracic rotation by up to 45°.
- Hip Flexibility: Stretches the deep external rotators, providing 30–40° of internal rotation.
- Core Strength: Engages your core to maintain an upright posture.
- Shoulder Range: Improves shoulder rotation by 15–20°.
Breathing Technique
Use your breath to guide the movement. Inhale to elongate your spine, and exhale as you deepen the twist. This breathing pattern increases intra-abdominal pressure by 20%, making the rotation deeper and safer.
Modifications for Success
- Sit on a folded blanket to ease hamstring tension.
- Keep your bottom leg extended if your hips feel tight.
- Use a wall behind you for extra stability.
- Start with shorter holds of 15–20 seconds, gradually increasing as you progress.
Form Tips
| Mistake | Effect | Fix |
|---|---|---|
| Collapsed chest | Limits rotation by 40% | Keep your spine tall and elongated |
| Over-twisting neck | Risks cervical strain | Turn your head last and gently |
| Lifted opposite hip | Reduces hip stretch benefits | Keep both sit bones firmly grounded |
Pay attention to these details to practice the pose safely and effectively.
Special Considerations
- Start with 15–20 second holds and work up to 30–60 seconds as you build strength and flexibility. Advanced practitioners can aim for up to 90 seconds.
- Practice this pose three times a week for the best results.
- Avoid this pose during pregnancy or if you have severe spinal injuries.
This content is for informational purposes only and should not replace professional medical advice. Always consult a healthcare provider before beginning a new fitness routine.
10. Forward Fold (Uttanasana)
Forward Fold helps stretch your hamstrings, ease tension in your spine, and improve hip movement. After twists and lunges, this pose helps reset and relax your back.
Step-by-Step Instructions
- Stand with your feet hip-width apart.
- Hinge forward from your hips, keeping your spine straight.
- Let your arms dangle toward the floor.
- Keep your knees slightly bent to avoid straining your hamstrings.
- Relax your head and neck completely.
- Stay in the pose, breathing deeply and steadily.
Benefits
This pose offers several physical benefits:
- Spinal Relief: Reduces tension in your spine.
- Hamstring Stretch: Loosens and activates the hamstrings.
- Lower Back Ease: Alleviates tightness in the lumbar area.
- Improved Hip Movement: Promotes proper hip hinge mechanics.
Breathing Technique
Breathe deeply and mindfully. Inhale to lengthen your spine, and exhale to fold deeper into the pose. This focused breathing helps you relax further.
Modifications for Success
- Use yoga blocks under your hands if reaching the floor feels uncomfortable.
- Lean on a chair or wall for added stability.
- Bend your knees more if your hamstrings feel tight or strained.
Form Tips
| Common Mistake | Impact | Correction |
|---|---|---|
| Rounded back | Puts strain on spinal ligaments | Hinge at the hips and keep your spine long |
| Locked knees | Can cause unnecessary strain | Keep a slight bend in your knees |
| Overreaching | Reduces spinal lengthening benefits | Focus on keeping your spine extended |
| Tense neck | Prevents full relaxation | Let your head hang freely and relax your neck |
Special Considerations
- Perform this pose when your muscles are warm to avoid injury.
- Beginners can hold the pose for 15–20 seconds to start.
- Skip this pose if you have acute lower back pain.
- To exit, roll up slowly, one vertebra at a time.
This guide is for informational use only. Consult a healthcare provider before starting any new fitness or wellness routine.
Quick Reference: Pose Comparison Chart
Use this chart to identify pose targets, difficulty levels, and recommended hold times.
| Pose Name | Target Areas | Difficulty | Key Benefits | Recommended Hold Time |
|---|---|---|---|---|
| Cat-Cow | Spine, Core, Neck | Beginner | Improves spinal flexibility, activates core, enhances neck mobility | 5-10 breath cycles |
| Low Lunge | Hip Flexors, Quads, Groin | Beginner-Intermediate | Enhances hip mobility, stretches quads, improves balance | 30-60 seconds per side |
| Deep Squat | Hips, Ankles, Lower Back | Intermediate | Boosts hip mobility, increases ankle flexibility, strengthens lower body | 1-3 minutes |
| Bridge Pose | Spine, Hips, Chest | Beginner | Extends spine, activates hips, opens chest | 30-45 seconds |
| Warrior II | Hips, Legs, Shoulders | Beginner-Intermediate | Opens hips, builds leg strength, increases shoulder mobility | 45-60 seconds per side |
| Downward Dog | Shoulders, Hamstrings, Calves | Intermediate | Stretches the entire body, improves shoulder mobility, lengthens posterior chain | 30-60 seconds |
| Child's Pose | Lower Back, Hips, Shoulders | Beginner | Relieves spinal tension, opens hips, reduces stress | 1-5 minutes |
| Thread the Needle | Upper Back, Shoulders | Beginner | Improves thoracic mobility, releases shoulders, promotes spine rotation | 30-45 seconds per side |
| Half Lord of the Fishes | Spine, Hips, Neck | Intermediate | Enhances spinal rotation, increases hip mobility, improves neck flexibility | 30-45 seconds per side |
| Forward Fold | Hamstrings, Lower Back | Beginner | Stretches hamstrings, decompresses spine, relieves lower back tension | 1-2 minutes |
Using This Chart
Choose poses based on your mobility level, target areas, and any physical considerations.
Tip: Begin with shorter hold times and gradually increase as your flexibility and comfort improve. Always listen to your body and make adjustments as needed.
Practice Tips
- Beginners: Start with simpler poses and keep hold times short.
- Intermediate: Combine multiple poses to create a well-rounded routine.
- Advanced: Sequence poses together and extend hold times for a deeper practice.
This guide is for informational purposes only. Consult a healthcare professional before starting a new fitness or wellness program.
Conclusion
Practicing yoga regularly can greatly benefit both your body and mind. Studies highlight that adding these ten poses to your routine can help improve joint mobility, balance, and circulation. This is especially important as we age, as it may lower the risk of falls. Additionally, yoga can help reduce stress, leading to clearer thinking and an overall sense of well-being.
This sequence works well for both beginners and experienced yogis, providing a solid base for improving movement in everyday life. Here's a quick look at the key benefits:
- Increased joint flexibility and range of motion
- Improved balance and stability
- Better blood flow throughout the body
- Reduced stress and mental tension
- Easier movement in daily activities
These benefits not only support daily activities but can also lead to a deeper and more rewarding yoga practice. Be sure to check out other Fitup resources, such as morning yoga routines, mindful movement tips, and mobility exercises tailored for different age groups.
By following the step-by-step guidance in this article, you can build a consistent routine that grows with you over time. Stay patient and committed - each session brings you closer to greater physical ease and overall wellness.
This article is for informational purposes only and does not substitute for medical advice. Always consult a healthcare professional before starting a new fitness or wellness program.
FAQs
What are some ways to adapt these yoga poses if I have limited flexibility or past injuries?
If you have limited flexibility or a history of injuries, you can adapt yoga poses to suit your needs. Use props like yoga blocks, straps, or bolsters to provide support and maintain proper alignment. Focus on gentle, controlled movements and avoid any poses that cause discomfort or pain.
Listen to your body and make adjustments as needed. For example, you can bend your knees in forward folds or use a wall for balance in standing poses. The key is to move at your own pace and prioritize safety over depth in each pose.
What are the benefits of combining mobility and flexibility through yoga?
Combining mobility and flexibility in yoga offers a range of physical and mental benefits. Mobility focuses on improving joint movement and control, while flexibility enhances the ability of your muscles to stretch and lengthen. Together, they help you move more freely, reduce stiffness, and lower the risk of injuries in daily activities or workouts.
By practicing yoga poses that target both, you can build better posture, increase strength in functional movements, and support long-term joint health. It's also a great way to relieve stress and improve overall body awareness, making it a holistic approach to well-being.
How often should I do these yoga poses to improve my mobility?
For noticeable improvements in mobility, it’s generally recommended to practice these yoga poses 3 to 5 times per week. Consistency is key, so try to incorporate them into your routine regularly. Even dedicating 15–30 minutes a day can make a significant difference over time.
Listen to your body and adjust the frequency as needed, especially if you're new to yoga. If you're unsure, consulting a yoga instructor or physical therapist can help you create a plan that works best for your needs and goals.


